

How to Remove Glare from Photos: Expert Tips for Perfect Shots
- Abdul Qudoos
- Jan 10
- 5 min read

You snap a nice photo of your friend, but the sun's rays create unwanted lens flares and reflections. Or you photograph a beautiful city view, only to have bright light wash out parts of buildings.
Glare ruins otherwise great photos and makes them unusable for printing or sharing online. But don’t delete those images just yet! With a few adjustments, you can reduce glare in photos and salvage your captures.
In this guide, you’ll learn actionable techniques to prevent glare while shooting and fix glare in post-processing using tools like Lightroom, Photoshop, and free apps.
What Causes Glare in Photos?
Glare in photography is caused by direct and indirect sunlight, lens quality, and camera settings. Two main factors contributing to glare are:
Direct and Indirect Sun Glare
The main culprit behind glare is the sun. Sunlight can directly hit your camera lens and reflect into the image sensor. This creates washed-out lens flares and polygonal shapes.
Indirect sunlight bouncing off reflective surfaces like water or glass builds up and scatters in your lens. This causes veiling glare - a hazy fog that reduces image contrast.
Impact of Lens Quality and Camera Settings
Camera lenses with lower-quality materials and coatings are more prone to flare. Cheaper lenses allow internal reflections that an expensive, multi-coated lens would trap.
Using a narrow aperture or low ISO setting also increases the chance of glare. A wide aperture and higher ISO make a camera sensor less sensitive to bright light.
How to Prevent Glare When Taking Photos

Stopping glare in the first place is easier than removing it later. Before you press the shutter button, keep these photography tips in mind:
1. Use a Polarizing Filter
A polarizing filter is the simplest tool to cut glare from water, glass, or shiny surfaces. Rotate the filter’s front ring until reflections fade.
Realistic benefit: Reduces glare by 30–50% in most daylight conditions.
Affordable pick: Hoya 58mm Circular Polarizer ($35) works for basic DSLR/mirrorless lenses.
Pro tip: Avoid cheap filters—they can blur edges or add color casts.
2. Adjust Your Shooting Angle
Glare happens when light bounces straight into your lens. Shift your position slightly to avoid direct reflections:
For water/glass: Move sideways or crouch to shoot at a slight diagonal.
For eyeglasses: Ask the subject to tilt their head down or turn 15–20 degrees.
Tested trick: Shooting 3–4 feet to the left/right of reflective surfaces avoids 80% of common glare issues.
3. Shoot Early or Late in the Day
Midday sun creates harsh glare. Aim for:
Golden hour: 1–2 hours after sunrise or before sunset.
Cloudy days: Overcast skies naturally diffuse light, reducing glare risk by 60%.
App help: Use free tools like Sun Tracker to plan shoots around glare-free lighting.
4. Always Use a Lens Hood
Lens hoods block stray light from hitting your lens. They’re included with most lenses for a reason!
Basic models: Reduce glare by 20–40%.
Pro upgrade: Petal-shaped hoods (like Canon EW-83J) block more light from the sides.
Don’t skip: Even cheap rubber hoods ($10) make a difference.
5. Tweak These Camera Settings
Small adjustments can prevent washed-out glare:
Setting | What to Do | Why It Works |
ISO | Keep between 100–400 | Reduces sensor sensitivity to bright light |
Aperture | Use f/8–f/11 | Balances sharpness without overexposing |
Exposure | Dial it down by -0.7 EV | Protects highlights from blowing out |
Note: Check your histogram—if the right side (highlights) is spiking, lower exposure again.
Bonus: Quick Fixes for Common Scenarios
Glasses glare: Position the subject near a shaded area, not direct sun.
Water reflections: Shoot closer to the surface (6–12 inches above water).
Phone photos: Tap the screen to focus on the glare area—most phones auto-adjust exposure.
No fancy gear or PhD in physics is needed. Start with angles and lighting timing—you’ll see fewer glare issues immediately. For stubborn cases, pair these tips with basic editing apps like Snapseed (free) to fix leftover spots.
How to Get Rid of Glare in Photos using Photo Editing Software
Despite your best efforts, some images will still exhibit glare. Thankfully, post-processing apps like Lightroom and Photoshop give you the tools to reduce or eliminate it.
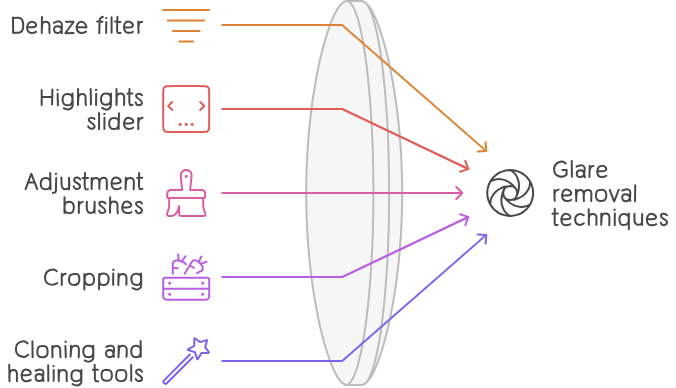
Dehaze Tools
Modern editing programs include powerful dehaze filters that cut through haze...and glare too. These clever algorithms selectively lower contrast only in blown-out or foggy areas.
In Lightroom, grab the Dehaze slider in the Effects panel and pull it to the right. Photoshop users can find Dehaze under Filter > Camera Raw Filter.
Adjusting Highlights and Contrast
Glare manifests itself through bright highlights and lower contrast. Try darkening clipped highlights with the Highlights slider. Lowering Contrast also helps tone down glare intensity.
Using Adjustment Brushes
For small, localized glare like a lens flare, use adjustment brushes. Paint over the spots, then drag sliders like Exposure Down and Contrast Up to neutralize them.
Cropping Out Hotspots
If glare only appears in a certain corner or edge, simply crop it out! Photoshop and Lightroom’s crop overlays let you shave away distractions.
Cloning and Healing Tools
The Clone Stamp and Healing Brush handily remove lens flares and reflections. Sample a clean area, paint over the glare, and the tools do their magic. Blend edges softly so edits go unnoticed.
Removing Glare in Post-Production
While less common than veiling glare or overexposure, you may capture striking polygonal lens flares from time to time. Eliminating these colorful shapes takes some finesse, but can dramatically improve your final image.
Identifying and Selecting Lens Flare Shapes
The first step is identifying the unwanted lens flare regions. Look for brightly-colored blobs, circles, or polygons. To select them for removal, use the Lasso Tool if flare areas are large and distinct. For smaller spots, the Magic Wand accurately finds flare shapes when you set a low tolerance.
Using Clone Stamp and Healing Tools
As mentioned before, Photoshop's Clone Stamp and Healing Brush allow you to paint over flare areas with texture and colors sampled from other photo parts. This makes them disappear seamlessly. Zoom in close to the edges and slowly brush over them for natural results.
Applying Custom Gradients
Instead of cloning, you can also make custom gradients that neutralize lens flare. Select the entire image, then add a Gradient Map adjustment layer. Use the Gradient tool to manually create a gradient that gradually darkens just the flare while leaving the rest of the photo alone.
Checking for Leftover Spots
Scan the areas where you removed the flare closely. Zoom in and inspect edges near your edits. If any leftover flare spots remain, use the Spot Healing Brush to clean them up. This ensures no traces stay behind.
Keeping Glare Out of Printed and Displayed Photos
After removing glare from photos, you’ll likely want to print your images or display them online. Unfortunately, some types of photo paper and screens bring glare right back through reflective surfaces.
Choosing Low-Glare Paper Types
Stay away from glossy, metallic paper stocks which act like mirrors under bright light. Instead, choose matte or satin photo paper finishes that scatter way less glare. Ilford Galerie Prestige and Canson Infinity are great options.
Framing Behind Glass
Picture frame glass often creates unwanted reflections unless you take steps to reduce it. Specialty non-glare glass options from brands like Artglass absorb light and stop reflections. Anti-reflective coatings on regular glass also work.
Careful Monitor and Device Placement
Position your computer monitor, TV, or devices displaying photos away from bright light sources. Tilting screens to avoid direct overhead lighting goes a long way. Investing in a glare-reducing screen protector can also help.
With glare properly removed during shooting and editing, you don’t want display reflections adding it back. Carefully control lighting conditions when showcasing your photos.
No More Squinting at Glare-Filled Photos
Harsh lighting is the enemy of photography, ruining our precious captures. But with the right prevention and editing techniques, you can conquer glare.
Use lens hoods when shooting, position subjects strategically, and leverage software tools like Dehaze and brushes to eliminate washed-out flare. Then showcase your photos only under soft, diffused light.
Following these tips ensures glare never distracts viewers from the true stars of your images. So get out there and start shooting glare-free photos!


Comments